

2012年10月30日 星期二
2012年10月29日 星期一
NC700 Givi Pannier and Tail Box

2012年10月27日 星期六
Anti-theft GPS/ GSM/GPRS module with shock sensor and vehicle listening

Shock sensor will notify you at once. False alarm is prevented by the processor of the Shock sensor (not shown here). The processor will analyse the shock amplitude and the frequency of the shock. A preset algorithm will decide whether that is a real attack. In addition , a sensitiy knob can be adjusted for addition tunning of the sensitivity.
One can remotely listen to the vehicle environment for suspicious attack. GPRS based has GPS fence guarding but it may be too late if the vehicle is already stolen and moved away.
Lithium backup battery with auto-recharge, that is completed separated from the vehicle main battery.
NC700 Rear Fender

Anodized Aluminium Fender . It takes 5 minutes to install by taking down to two 6mm hex nuts from the stock plastic fender.
Tilting High/Low HID compare to Halogen Bulb
Taken or adjusted to F/2.6; Shutter; 1/15 /Iso 160

Stock Low Beam.

HID Low Beam. Not focused well when comparing to the stock. But still it is acceptable after adjusting the headlight mounting screw.

Stock Halogen High beam.

HID High beam by tilting solenoid. The displacement is not adequate to achieve a higher beam, provided that the low beam is adjusted down to avoid glare.
2012年10月20日 星期六
Adding Voltmeter


NC700 HID Installation

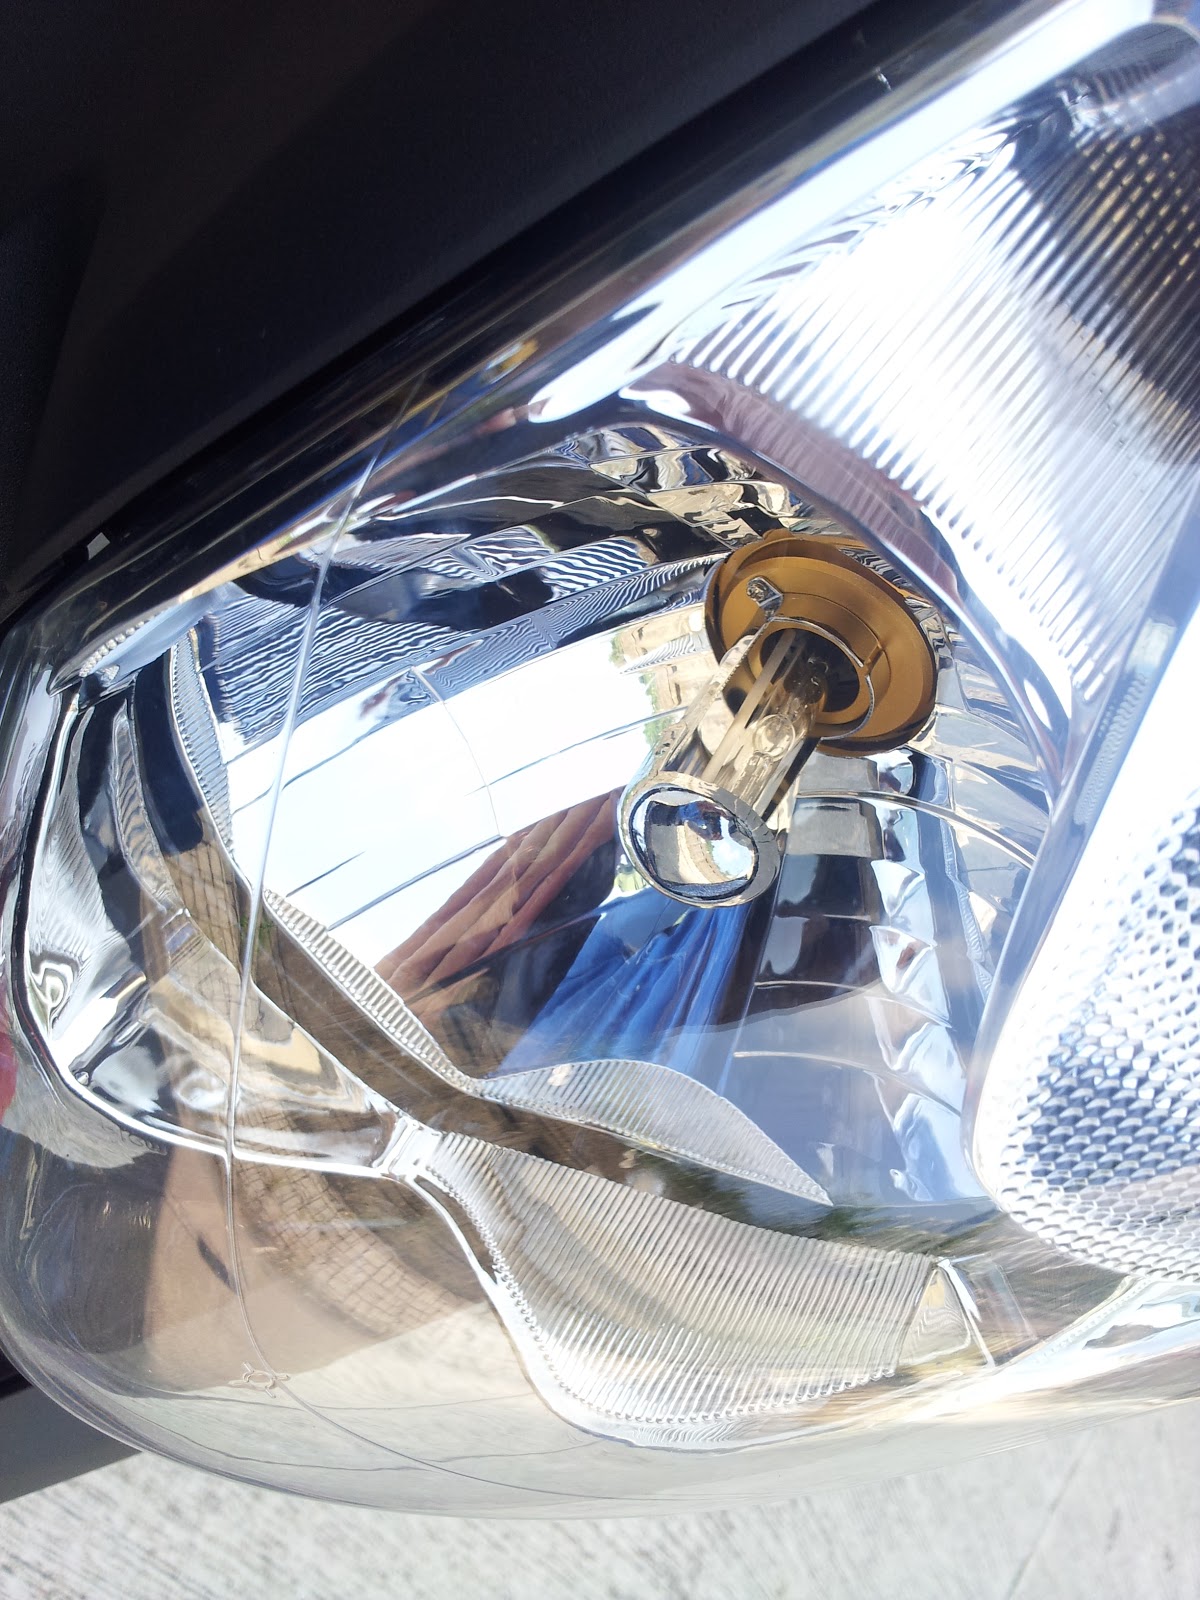
Poor Alignment of Hi/Low HID
 Off center HID bulb with Hi/Low Tilting control by means of a solenoid at the base. However, the bulb is glued with silicon that is tilted to one side.
 After removing the silicon glue at the base and realign the bulb.
 NC700 Efficient Engine

2012年10月18日 星期四
NC700 Front Brake Lever


2012年10月17日 星期三
NC700X Caster Angle
After Lowering my rear shock, the caster angle increase from 27 degree to 29 degree and this result in noticeable decrease in steering reponse. I end up lowering the front fork by 2cm to reach a caster angle of 26 degree ( Stock 27 degree). This gives a much better steering response without the feel of a slow stable elephant.
Tools need: 14mm wrench and ? mm hex key. 45-50mm hose clamp x 2.


2012年10月14日 星期日
.JPG)
.JPG)
Engine Air Filter
.JPG)
.JPG)
Straightening a bent lever , Annealing 退火
.JPG)
.JPG)
.JPG)
.JPG)
.jpg)


Caster Angle after Lowering

After Lowering the bike by 4cm, the Caster (Trail Angle) becomes 29 degree. (Stock 27 degree) . It gives better forward cruising stability. However, the ease of turning at round around is noticeable slower. Will lower down the front fork by 2cm when I get the correct tool.
2012年10月12日 星期五
NC700 Center Stand Installation Manual
http://nc700-forum.com/forum/nc700-mods/827-oem-honda-center-stand-install.html
All credit to OriginalRocket. I post here for easier search from google.


Step 1. Connect the springs to the SPRING HOOK
Step 2. Connect the springs to the CENTER STAND
Step 3. Start on the LEFT SIDE of the bike. Slide the MAIN STAND SHAFT into the bikes bracket and into the stand itself.
Step 4. Use the foot press part of the MAIN/CENTER STAND as a hand hold, and pivot the stand into alignment as close as you can get it. Use a friend to help guild you. It will take a bit of strength, but not nearly as crazy as it is to stretch those springs.
As you pivot the stand into alignment (you are aligning the right side by the way) Use your free hand to swing the rubber mallet and moderately hit the MAIN STAND SHAFT to slide it into the right side bracket. This may take some finesse, but it works.
Step 5. Secure MAIN STAND SHAFT with the 6 MM PLUG BOLT. I used blue loctite, as I do not want this coming loose.
ps: I do not remove the exhaust pipe bolt to free the way to screw the spring hook . But you need a small hand and a cool pipe.
I do not hammer the shaft as the mounting hole on the chasis is a tight fit and I have no assitance to guide the alignment.
I choose to install the spring after installation of the main stand and shaft. All you need is a twisted nylon cord, a handle and a medium strong arm that can pull 20-30 kg. The spring hook will just pop in with a single pull.
2012年10月11日 星期四
NC700X Lowering Kit
.JPG)


I install the centre stand and now is the lowering kit
The center to center distance of this kit is 15cm.
Tools needed:
1) hydraulic jack to adjust the rear wheel height in order to release tension on the link bolt. (this is not necessary if you have a friend to help you)
2) Hex wrench 14mm, 17mm
Steps:
1) Park the bike on road side over center stand such that the rear wheel will hang in mid air. There should be ~3 inch clearance from the ground.
2) Loosen the 17mm bolt on the exhaust pipe side. The 14mm bolt is still hard to be removed, because of the weight of the rear wheel.
3) Jack the rear arm with hydralic (any jack), till the 14mm bolt is free to be removed by finger.
4) The new link is longer and you have to jack up the rear arm further (1-2") to align 14mm bolt.
5) Bolt in the 14mm bolt and 17mm nut. Secure with loctite.
20 分鐘
一人安裝, 要細jack, 17mm , 14mm 板手,
上大架, 泊在路肩讓尾6灕地
鬆死氣果邊2粒17mm帽
jack 起橫臂(1"), 直到條14mm 大螺絲可以用手指拉出
jack 高多1-2", 放入新狗骨及14mm 大螺絲
落藍色loctitie ; 上緊2粒 17mm 帽
Honda NC 700 Main Stand

Nylon Cord 1.5m tied both ends in a single closed loop, folded against itself for 2 times.

Main stand already bolted on the frame. Upper spring holding screw in place (Be careful it locates medial to the exhaust pipe, so you must let it cooled down as the space is very limited there. A thin white string is used to keep the stand in elevated position )

The smaller and longer spring is first to be pulled into place (as the upper end of the thinner spring sit more medial on the holding bolt). Pulling effort is alround 20kg. I use my right foot to step against the foot rest, counteracting the pulling force. The thicker spring should snap into the main stand anchor by itself if the pulling axis is correct.
.JPG)

訂閱:
文章 (Atom)