2012年12月30日 星期日

Scratching my helmet

The two hex screws inside the storage compartment has sharp edges that persistently scratching my helemt. I have ti put some foam tape to fix it.


2012年12月24日 星期一

Airhorn trigger

More ergonomic than the stock thumb button. Left index finger can be used to fire yhe jorn. Thumb was left to have a tight grip of the handlebar  during emergency brake.


2012年12月19日 星期三

Compare stock 20W bulb and 10W (3W measured) LED

 
The stock looks more amber and diffuse and the LED (No lens ) looks more centred and cool.

2012年12月16日 星期日

Add horn switch to DCT

DCT  version free your left hand. During emergency stop, your left thumb will be busy in gearing down, switching on hazard light etc. I found it is attrachtive to add a horn switch to left index finger, so that the left thumb can keep maintain a tight grip on the handle bar. This is room inside the switch hub and you need a knife to get away enough plastic to place a tiny microswitch.


2012年12月7日 星期五

Yellow 7.5w signal led

Benchtest current drawn 180mA only, that is 2.3w only. Claim to be 7.5w (1.5w x 5 led ). Right is led. Left is stock bulb.

Brake light LED

Replace 20w bulb with a 3w (claim 10w T6) white led. Benchtest with 13v and current drawn is 200mA. Brightness is same as as stock without a yellow tinge. The right signal lamp is yellow led (looks like having a transparent cover), wheras left is stock.


2012年12月2日 星期日

LED Flasher Relay

NC700 use Mitsuba FR33-025 as signal flasher relay. It has 4 pins connect the 2 hazard/turning indicator switch and the left/ right bulbs. Changing low load/watt led will give the realy a wrong signal that the bulb filament is burnt and results in faster flashing rate. The easiest but an unwise way is to put a serial 10W resistor to comsume excess power. This defeats the benefit of using LED. So you have to use a dedicated flasher relay or mod the stock relay. The relay has a load sensing circuit that kicks in alternate circuit results in a faster flashing rate if the loading current decreased. So one have to trick the sensing circuit inside the relay, by increasing the resistance in the shunting wire/ resistor . This cause more current to flow through the current sensing circuit.

This can be achieved by
1) Dremel the thick shunt wire inside the relay, or replace the bare wire with a higher resistance 3W 0.1 Ohm resistor or 3A diode.
2)  Cut the sensing circuit, but this requires more knowledge of the circuit


Sample stock relay

Sample Mod with resistor to trick the sensing circuit.

Clear signal led mod

Looks more fashion..


2012年12月1日 星期六

Reduce the rear shock preload

Stock setting was a bit hard for single  rider of 60kg. Adjust the top nut anti clockwise by 2~3circle make a huge difference. Now no more ass kicking over bumps.
U need special wrench , or a long screw driver and a light hammer.


Givi Monokey FZ1111 & M5 plate

Easy 15minutes installation. Hex key 5,6mm. Wrench 10,14mm. My Givi set has missing  four M8 hex nut in the bag. So check it carefully.


2012年11月26日 星期一

Rear Hugger

Matching and pending for best hugger colour. Think of red but seems not very good looking. Will try metallic grey..


2012年11月24日 星期六

Rear brake light removal

This philip screw is impossible to be unscewed. Likely it is glued and I eventually have to use brutal method.


2012年11月22日 星期四

DCT gear box oil filter

Access to change the gear oil filter. X version  DCT version use same engine oil for lubrication of engine and and transmission. But it uses 2  separate oil filters.

Coolant Reservoir

You need to loosen the right lower fender to access the level marker. This photo is taken 2 weeks after returning from the dealer's 1st month maintainence check . Obviously, the technician did not check the low coolant level.

Air intake and filter

The stock air filter. Suprisingly large for a 700cc bike.


The air intake rubber hose. Take a careful look as the Japanese version has one of the inlet closed to reduce the hosepower limitation in Japan.

2012年11月6日 星期二

Gps anti theft

Realtime tracking and vibration alarm sms notification with dial back listening function.


2012年11月4日 星期日

NC700 Temperature Sensor

The temperature sensor is made by NTCL Nippon Thermostat , Model HH1
Range : -40~130 deg Cel.
Type : NTC (Negative Constant)
Test ~40 deg , resistance ~330 Ohm
 ~60deg, resistance ~180 Ohm
So it is not difficult to tap the signal to feed an external digital temp. display.
Work in progress.

2012年10月29日 星期一

NC700 Givi Pannier and Tail Box

Givi Pannier, Tail Box, Crash guard, shock dust cap, handle bar guard, windscreen , rear hugger ..

2012年10月27日 星期六

Anti-theft GPS/ GSM/GPRS module with shock sensor and vehicle listening

DIY by adding shock sensor to a GPS module with call back function (GSM phone) .

 Shock sensor will notify you at once. False alarm is prevented by the processor of the Shock sensor (not shown here). The processor will  analyse the shock amplitude and the frequency of the shock. A preset algorithm will decide whether that is a real attack. In addition , a sensitiy knob can be adjusted for addition tunning of the sensitivity.

One can remotely listen to the vehicle environment for suspicious attack.  GPRS based has GPS  fence guarding but it may be too late if the vehicle is already stolen and moved away.

Lithium backup battery with auto-recharge, that is completed separated from the vehicle main battery.

NC700 Rear Fender


Anodized Aluminium Fender . It takes 5 minutes to install by taking down to two 6mm hex nuts from the stock plastic fender.

Tilting High/Low HID compare to Halogen Bulb


Taken or adjusted to F/2.6; Shutter; 1/15 /Iso 160
Stock Low Beam.
 
HID Low Beam. Not focused well when comparing to the stock. But still it is acceptable after adjusting the headlight mounting screw.
 
Stock Halogen High beam.


 HID High beam by tilting solenoid. The displacement is not adequate to achieve a higher beam, provided that the low beam is adjusted down to avoid glare. 

2012年10月20日 星期六

Adding Voltmeter

This is a good idea to add a voltmeter so that you can replace the battery before trouble happens. This is the voltage (on loading)  with engine off but HID started (3A-7A current drawn)  ~12.1V. During engine startup, the voltage will drop trasiently to 10.6V and quickly back to 13.4V on charging.

NC700 HID Installation

This is a 55W Ballast with internal water proof (fill with expoxy) . It is warm to touch after long run.
The high low beam is made possible by a tilting mechanism through a solenoid at the base. It works perfectly such that the HID light is shield and focus by the stock reflector. Also the low beam is set to follow local rules , without glare to other driver. This is a 30 mins job and is totally reversible. Certainly, without a lens projection housing, the result will be less than perfect.

Poor Alignment of Hi/Low HID

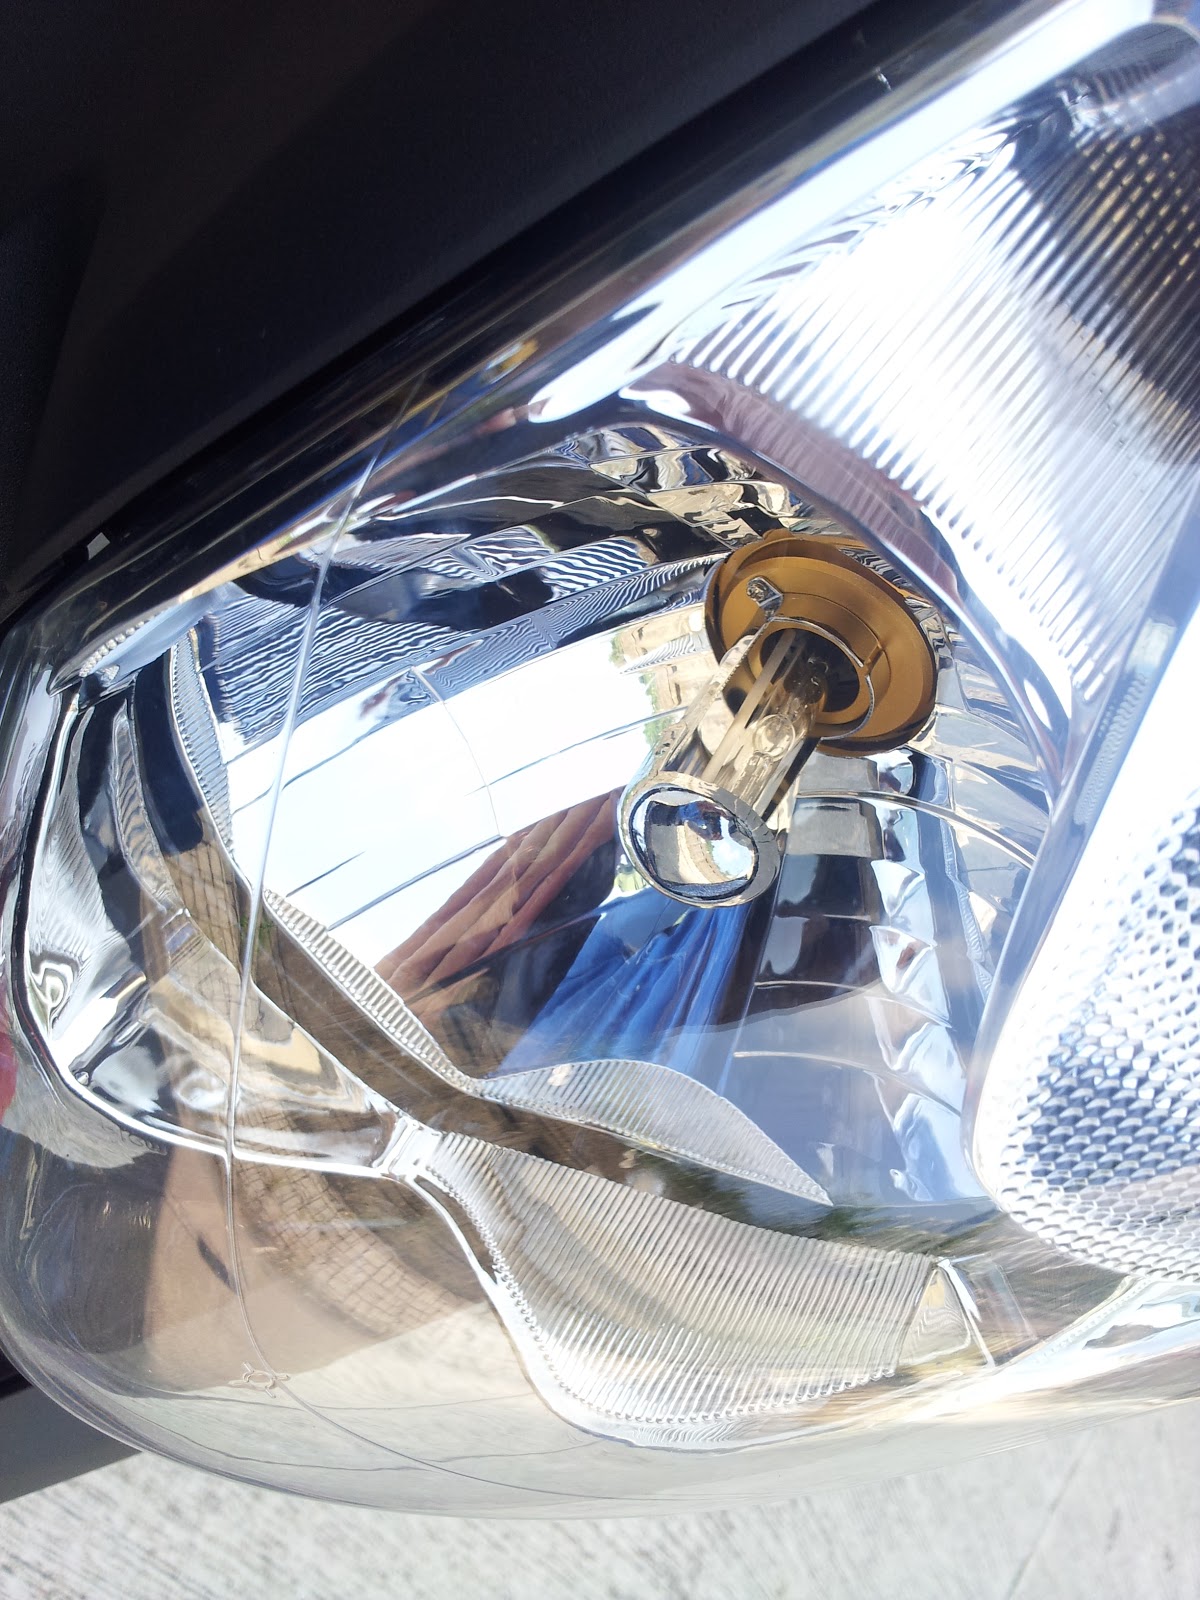
Off center HID bulb with Hi/Low Tilting control by means of a solenoid at the base. However, the bulb is glued with silicon that is tilted to one side.


 After removing the silicon glue at the base and realign the bulb.
 

NC700 Efficient Engine

Just finished my first tank of gas. It runs 280km for 10.56L ($172 HKD). Full tank is 14L, but the fuel gauge lit up at around 3 L left for a good  Average gas consumption is 26.5 km / L, or  $0.61 / km. The run distnace is approximately 50%  city road and 50%  highway of 70 km/hr. 70% of the time in D mode and 30% in Sport Mode.  I am quite happy with this efficient bike.

2012年10月18日 星期四

NC700 Front Brake Lever


Just changed a new golden adjustable lever. Much better feel as now all my fingers can reach the lever naturally.

2012年10月17日 星期三

NC700X Caster Angle


After Lowering my rear shock, the caster angle increase from 27 degree to 29 degree and this result in noticeable decrease in steering reponse. I end up lowering the front fork by 2cm to reach a caster angle of 26 degree ( Stock 27 degree). This gives a much better steering response without the feel of a slow stable elephant.
 
Tools need: 14mm wrench and ? mm  hex key. 45-50mm hose clamp x 2.
 
 1) Measure the planned lowering distance and secure the 2 hose clamp
 2) Loosen the top hex nuts.
 3) The lower 14mm Hex bolt is more tight and needs some levering. Once both lower bolt is loosened , the frame will drop by itself.
 4) This is how the top looks like. Secure all bolts and remove the clamp.
 
5) I use android phone to measure the caster angle by levering the bike with both tyres on the road. The software is xclinometer.